
Cabin Renovation: The Coat Dress
Introducing: Blueprints Renovations!


If you take a look around your neighborhood, you'll see all sorts of interesting renovations: additions, improvements, facades, details, and more. Customizing our houses is one of the ways we present our identity, from the most conspicuous Tuscan styled McMansions, to ultra-efficient and adorably decked out tiny houses on trailers. As an inherently creative species with a predominantly non-nomadic culture, cultivating living spaces (like adorning our bodies) comes naturally.
It is in this spirit that I'd like to introduce you all to a new feature on the website I like to call Renovations. Renovations are pattern alteration tutorials, designed to stretch each Blueprints pattern and inspire your own DIY spirit! I've re-imagined and altered clothing as long as I've been sewing and BOY is it fun! I hope these renovations with inspire you and encourage you to create and share your own renovations as well! The DIY spirit is contagious!
Cabin Renovation #1: The Cabin Coat Dress
This 'renovation' is inspired by one of the owners of JP Knit & Stitch in Boston, the always stylish Genevieve Day. She came to an event one night in an adorable vintage coat dress: simple blue corduroy with big, round brass buttons.
I love pieces that walk the fine line between garment types and this way a prime example. Quirky and sweet...just fitted enough to be flattering but trapeze-y enough to be comfortable and effortless.

I especially love corduroy. Often banished to the realm of musty college professors, hacky-sacking stoners, and elastic waist toddler pants, corduroy is a fabric with great warmth and lots of character! I decided to create a Cabin coat dress based loosely on Genevieve's vintage find, using Robert Kaufman's awesome 14 Wale Corduroy. (A wale, by the way, is the unit of measurement for corduroy's stripes). I figured I'd stick with the vintage vibe and use a 60's looking cotton print for the pockets and binding
I took these photos as the sun was setting and upping the exposure made the photos looks grainy and more vintage. This is what we call a "Happy Accident" and they're my favorite kind.


In keeping with the original inspiration, I decided to use big vintage brass buttons. It has a decidedly 'pretty smock' look because of the body of the corduroy, and I like it.

To make your very own Cabin Coat Dress, follow these instructions:
Decide whether you would like to finish your Coat Dress with bias facing or bias binding. You'll want to align your top button with this in mind. I did mine with bias binding, and decided to use 1/2" double fold binding, instead of the 1/2" single fold that the pattern calls for.
1. Trace a copy of the cabin front bodice. Mark the fold line as the center front(CF).
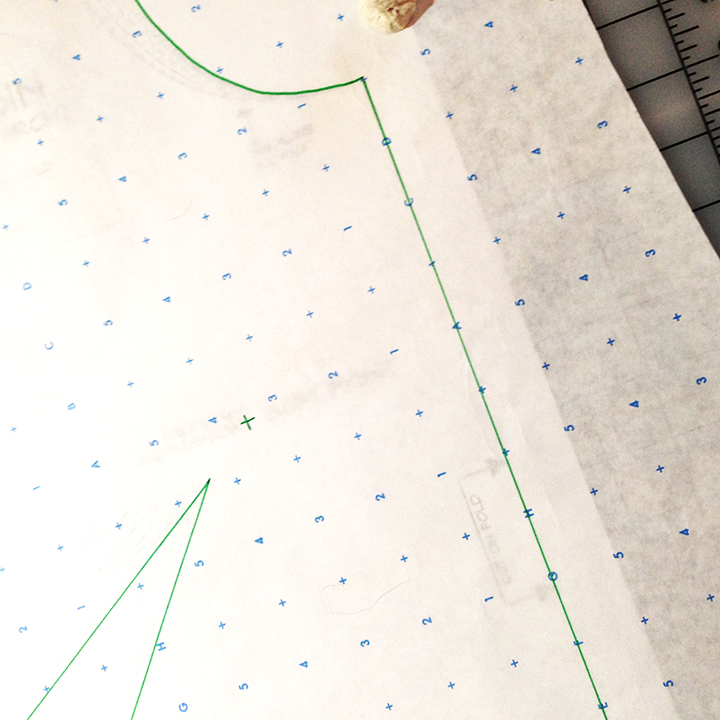
Here I used alphanumeric pattern paper to trace my pattern. This paper is slightly transparent, a bit heavier than tracing paper, and has letters, numbers, and crosses at 1" intervals. Here I've lined my fold line (now CF) with these markings.
2. Choose your buttons. Go with 5 - 7 large statement buttons for maximum impact. Those among you with masochistic tendencies may want to choose 30 tiny shell buttons ;)
3. Lay out your buttons along the center front line of your pattern, spacing them evenly. Usually, one goes slightly below the neckline, then they are placed an even distance apart, with the final button having one last equal 'space' after it.
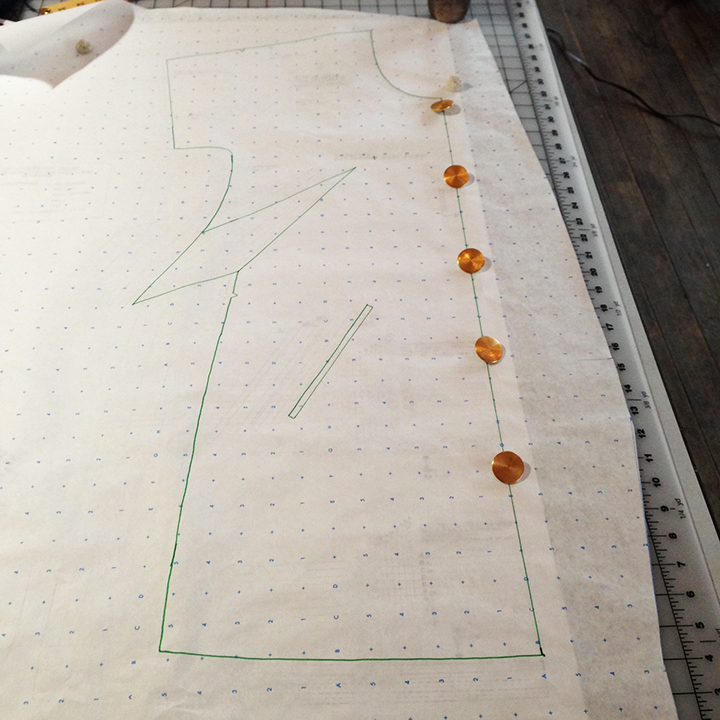
I opted to go with the original inspiration and use vintage brass buttons!
A note on top button placement: If you plan on finishing your coat dress with bias binding, you'll want to place your button further from the neckline, to give some 'breathing room' between the top button and the binding.

4. Once you are satisfied, trace around your buttons on the pattern then remove the buttons. Now you are left with button markings.

If you're using shank buttons like these, flip them over so they are easier to trace. Trace your buttons in pencil first, then go over with pen so you don't get pen marks on your buttons.
5. Next, extend out from the CF to create the button placket. A good rule of thumb for larger buttons is to make the extension width equal to 1/2" the width of the button. First, square out this distance from the CF, then use a clear ruler to draw a new edge parallel to the CF.

6. Add to this edge extension 1/4" seam allowance for bias facing or 1/4"-1/2" for bias binding. In this version, I'm using a wider 1/2" double fold bias binding (to make your own, press a 1" wide strip of bias, then fold in half) so I'm adding 1/2" seam allowance on the edge.


7. Mark your buttonholes.


If you want vertical buttonholes, use these marks as a guide, drawing a buttonhole along the CF that extends just beyond the button marking.
For horizontal buttonholes, make a point at the center of each button, then draw a horizontal line, perpendicular to the CF equal to the width of the button + the height of the button.
Sewing Steps
This new pattern piece will serve as both the right and left side of your dress front. On one piece, mark the buttons and on the other, mark buttonholes. Cut your pieces as instructed. You can still place the front near the fold, but cut all the way around it.
Sew as instructed until you reach the step when neckline binding is sewn on. Do not sew the neckline binding. Instead, proceed to the 2nd shoulder. Continue following the instructions until you reach the step where the hem bias tape is applied.
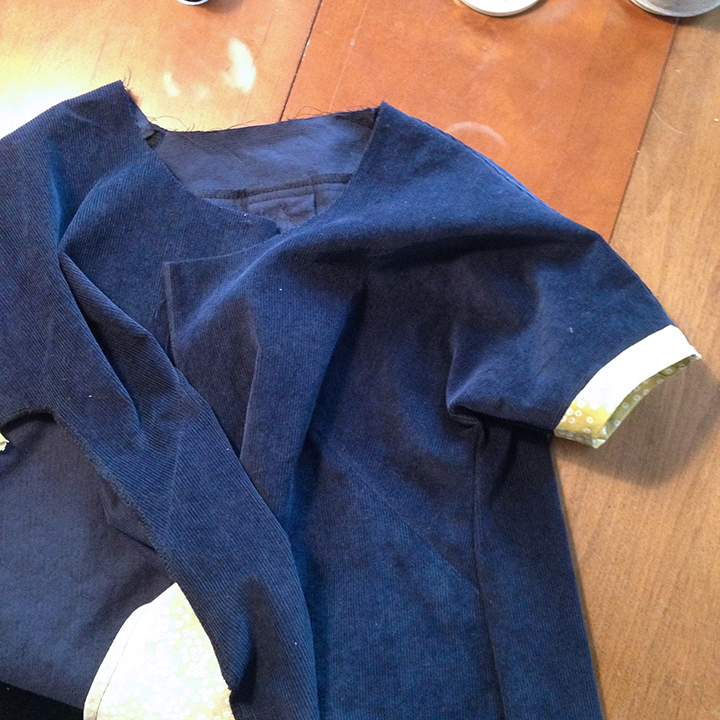
Shoulder seams and one side seam sewn and bias tape is attached to the sleeves.
Staring from one side seam, apply bias tape as instructed around the hem, up the coat front, around the neckline, down the opposite side, then back around to the side seam opening.
When you approach the corner, stop with the needle in the fabric a seam allowance's distance from the fabric's edge.

With the needle still sunk in the fabric, pivot around the corner. Fold the bias tape at a 90 degree angle as pictured.

Continue sewing along the edge. Repeat this process for the other 3 corners.

After attaching binding around the neckline, fronts, and hem, sew up your second side seam as instructed and finish the seam allowance.
Finally, finish your bias facing or binding as instructed. At the corners, fold in the bias as pictured to curve it around the corner. I wanted a rounder looking corner, but you can also create a very crisp mitered corner (perhaps a tutorial for another time!).

If you have a great idea for a Cabin renovation, please share it! Tag us on instagram or email links to your personal blog!