
Juniper: French Seam Pocket
I'm teaching a pants making class at JP Knit & Stitch in April and we're using the Colette Juniper Pants pattern. I have to say, I was a bit skeptical. I typically don't wear pants as I have a figure that makes it hard to fit them and impossible to find RTW that works. Many of my students have expressed a desire to be able to make and fit pants, so when the Juniper pattern came into the store I thought it would be a great opportunity try it out as a possible pattern option.
I personally have been looking for a higher rise, wide leg pant that didn't scream hippie mom or 1940's sailor (thought there's nothing wrong with those looks) and these fit the bill. I have to say, I'm quite pleased with both the fit and the rise so far. I think the absence of a fitted thigh is a huge advantage in my case (In a more fitted pant, I may blend sizes with a high hip 2 sizes bigger than my waist and a thigh/low hip one size bigger than that).
I also really like the pocket construction, and I used the opportunity to try out a slash pocket finish that I have done on a few pieces for clients. I got the idea from a pair of high end RTW shorts and I'm embarrassed to say I didn't think of it before.
I love any opportunity in a pattern to do a self seam finish: I do french (both real and faux) and flat fell seams whenever possible. I especially like this when to do so is sort of counter intuitive.
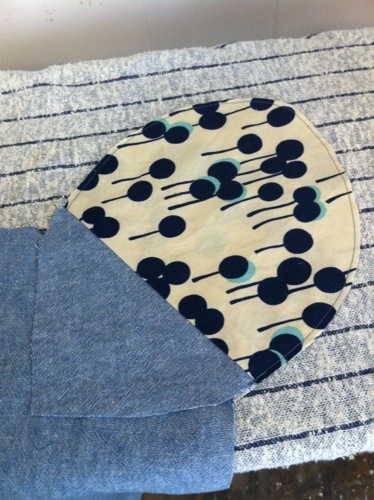
I wanted an extra strong pocket that was clean without any unravelies to stick out in the pants since they arent lined. I also wanted something lightweight, so binding wasn't in the cards. So here's how to do a french seam slash pocket bag on the Colette Juniper pants.
I realize that while I took the time to make a nicely finished pocket bag, I neglected to do anything at all to the seam joining the pants fashion fabric to the upper and lower pocket bag. In hindsight, I would have probably finished both seams with a flat felled seam sewn on the pocket bag side. I think I decided to do this finish after sewing those seams and was primarily lazy. I avoid undoing whenever possible...it's an exercise in acceptance.
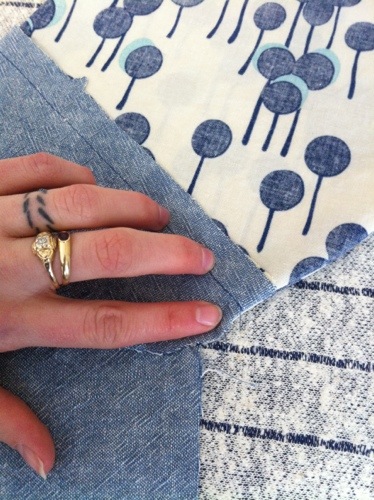
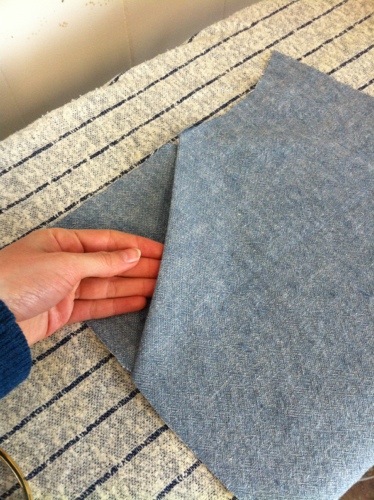
Step 1: With WS together, matching up notches, sew around the pocket bag at a 1/8" SA. Start and stop stitching at the pocket bag seam.
2. Turn the pocket inside out, push out the pocket along the seam using your fingers or a point turner.

Your stitching will extend almost all the way to the end of your pocket bag seam. The remaining, unstitched seam allowance should be folded out.
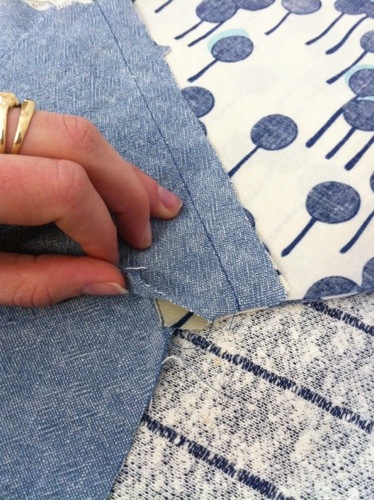
When sewing the pocket bag a second time on the actual seamline, you'll want to start and end where the pocket bag attaches to the main pants front. Mark this horizontal seamline with chalk or a pin if you need to.
3. Give the pocket bag a nice press.

4. Stitch around the pocket bag as indicated in the pattern instructions. Start with a 5/8" seam allowance at the beginning where your SA is unstitched. When you get to the part where 1/8" is stitched in, your SA should easily line up with the 1/2" mark. Continue stitching around the pocket bag at 1/2" until you come to the last bit of unstitched SA. You should easily be able to keep stitching as the fabric edge lines up with the 5/8" mark. Stitch until the pocket bag seam on the pants front, as indicated on the pattern.
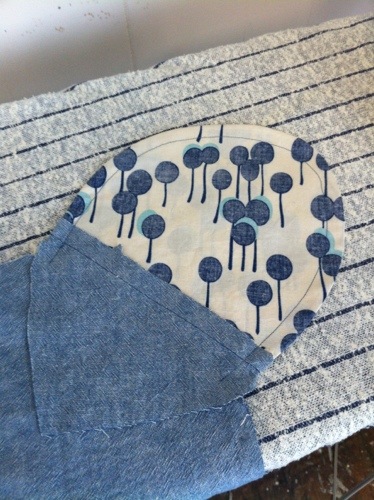
5. Fold the pocket into its final position and give it a good press.
You now have a nicely finished french seam pocket. A french seam is an idea finish for a pocket bag since it is one of the few applications you can use a french seam on a curve. Why? Because it is never turned right side out, and therefore the curves do not need to flex the other direction or lay flat, something that would be hindered by a french seam typically.

One of the best parts? With two seams, these pockets will be extra strong!
Can't wait to finish these babies up! As usual, Sarai's instructions, especially for complicated things (like fly insertion), are excellent. There was only one thing I would have done differently. The pattern calls for a 7" zipper. I prefer metal zippers in my clothing as they last longer, wont melt under an iron, and have a bit of a vintage feel that I love. In this pattern, your pants zipper is trimmed at the waistline. Though removing metal zipper teeth resulted in some interesting visuals, I think I would have preferred to use a 5"(4"?) zipper instead.